
Have you ever worked on the project which contains no documentation? Did you have the desire to add documentation but didn’t know where to start? Well, now we can check how we can do that in Elixir and see how powerful that functionality is.
To show examples of writing documentation in Elixir I will use the following project as an example.
It is simply a new project everyone can generate using mix new command with minimal changes.
More info how to generate a new project you can read in my article Elixir - first steps.
# lib/todo_list_inbox.ex
defmodule TodoList.Inbox do
  def header do
    "Inbox"
  end
end
# test/todo_list_inbox_test.exs
defmodule TodoList.InboxTest do
  use ExUnit.Case

  test "returns the header" do
    assert TodoList.Inbox.header() == "Inbox"
  end
end
→ mix test
Compiling 1 file (.ex)
.

Finished in 0.03 seconds
1 test, 0 failures
That is our green field project we will start to write our documentation from here.
ExDoc
To generate a nice looking HTML documentation we are going to use ExDoc tool.
That means we will need to add ExDoc tool as a dependency into our project.
To do that we need to extend the list of our dependencies with this item {:ex_doc, "~> 0.18", only: :dev, runtime: false}
You can read more about that tool on its GitHub page.
For now, that means we are going to use ex_doc library of version 0.18 (at the time of publishing this article) or higher and only in development environment.
So our deps function in the mix.exs file should look like:
  defp deps do
    [
      {:ex_doc, "~> 0.18", only: :dev, runtime: false}
    ]
  end
To install dependencies into our project we need to use the mix deps.get command in the terminal window from the project directory.
→ mix deps.get
Resolving Hex dependencies...
Dependency resolution completed:
  earmark 1.2.3
  ex_doc 0.18.1
All dependencies up to date
Now as our dependency is set up and ready we can start writing a documentation for the project.
Documenting modules
Let’s start by adding a description to our module. It will describe what our module is intended to do.
We would use @moduledoc attribute and we put it on the top of the file inside the module. The value of the attribute or the documentation body should be enclosed in triple quotes """. You can read about module attributes here.
Now our module should look in the following way:
defmodule TodoList.Inbox do
  @moduledoc """
    Provides methods for creating and handling a ToDo List
  """

  def header do
    "Inbox"
  end
end
Cool. Now we are ready to generate our documentation.
The mix docs command will do all the dirty work for us.
→ mix docs
==> earmark
Compiling 3 files (.erl)
Compiling 24 files (.ex)
Generated earmark app
==> ex_doc
Compiling 15 files (.ex)
Generated ex_doc app
==> todo_list
Compiling 1 file (.ex)
Generated todo_list app
Docs successfully generated.
View them at "doc/index.html".
Now we can open doc/index.html in the browser to see what do we get.
On the main page, we can see the list of our existing modules.
In our case, it is a single TodoList.Inbox module which contains description we have created.

On the left side of the page, we can see the name of our project, version, search bar and a menu.
The name and the version come from mix.exs file and can be updated for your needs.
defmodule TodoList.Mixfile do
  use Mix.Project

  def project do
    [
      app: :todo_list,
      version: "0.1.0"
      # ...
    ]
  end

  # ...

end
Clicking on the module name in this list will bring us to the documentation page of this particular module where we can see more information. For example list of the functions this module provides.

Here we can see that our module has a single function header/0 and that function has no documentation.
Let’s jump in and add documentation for that function.
Documenting functions
We can achieve it in the similar way of how we did it for the module, but we should use @doc module attribute instead.
This time we will add this right above our function definition.
@doc """
  Returns a header of the inbox folder
"""
def header do
  "Inbox"
end
Now we should regenerate our docs using mix docs command and open the docs/index.html file again.

Now if we navigate to the module page we can see our function has the description.
OK, that is a simple function. Let’s try to add one more function to the documentation as another example.
@doc """
  Adds a new item to the `list` with the description which is provided by `description` attribute.

## Examples

    iex> todo_list = TodoList.Inbox.add_item([], "First item")
    iex> [first_item | _] = todo_list
    iex> first_item[:description]
    "First item"

"""
def add_item(list, description) do
  list ++ [%{description: description}]
end
In this example, we have introduced a new function add_item/2.
The function accepts two arguments: a list and item’s description.
Once we call that function it will add a new item to the list we are providing.
First, you can see we are using backtick (`) symbol to highlight our arguments. ExDoc supports Markdown inside the documentation and we can use backtick the same way how do we use it in the Markdown.
Next, we have an example section which requires their own format:
First, we start it on the new line with two # symbols followed by the space and the Examples word.
Next, we have an indentation for four spaces followed by iex> text, space and then an actual working example.
We can have several iex> lines as you can see in your example.
Then we can provide the final result. The same result we can see in our Interactive Elixir.
Don’t worry you will understand the importance of this structure later.
Now let’s try to regenerate our documentation again and check our module page.
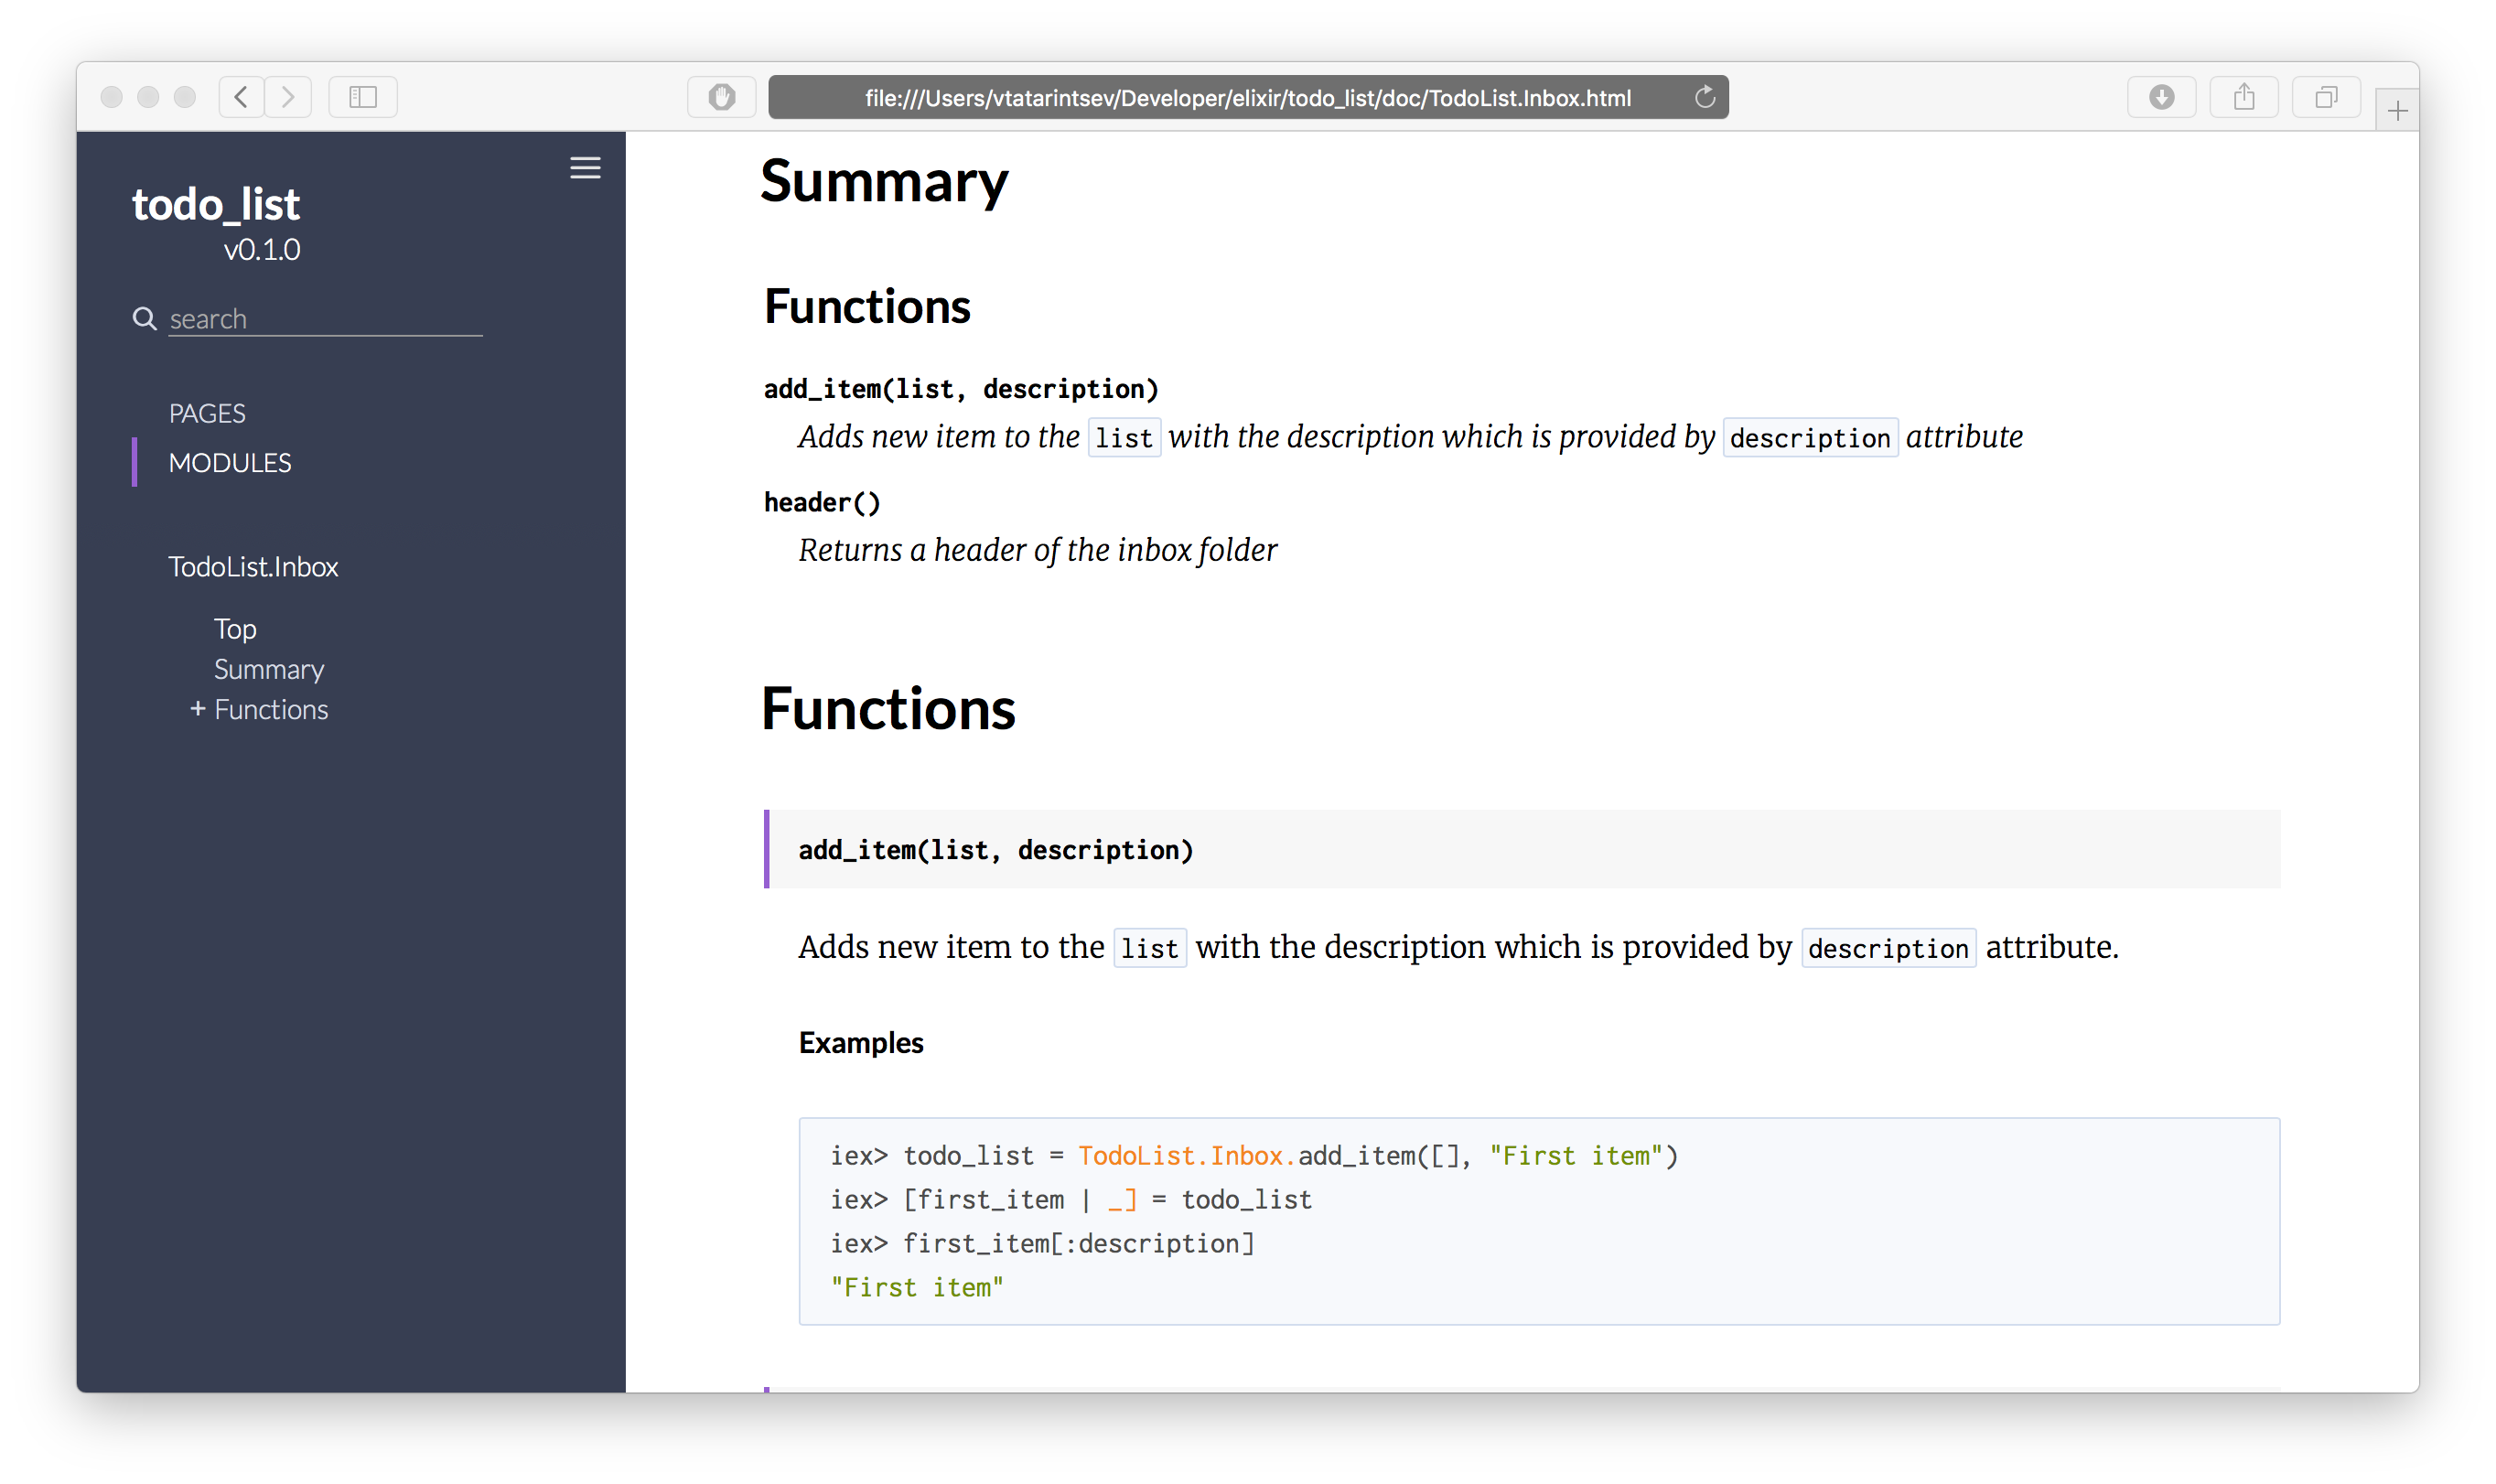
Now we can see a description of the add_item/2 function, we can see how do our list and description attributes have been highlighted in the description.
And also we can see our well-defined example as a separate section.
Let’s try yet another cool thing that Elixir provides us.
Doctests
As you remember from the beginning of the article we even have a single unit test for our header/0 function.
Let’s extend our test file by adding doctest TodoList.Inbox line.
defmodule TodoList.InboxTest do
  use ExUnit.Case
  doctest TodoList.Inbox

  test "returns the header" do
    assert TodoList.Inbox.header() == "Inbox"
  end
end
Let’s run our tests again
→ mix test
..

Finished in 0.06 seconds
2 tests, 0 failures
Now we can see we have two green tests. But where does the second test comes from?
So in Elixir, there is two type of tests we can write.
The one is using test keyword as we have in our file.
The second type is so-called “doctest”. That is where magic comes from.
Once we have and examples section in our documentation, the doctest will use that example to test our function.
That is why our examples should be in the working state.
To see that in action let’s change the last line of our example to be “Second item” instead of “First item” and run our tests again.
→ mix test
Compiling 1 file (.ex)


  1) test doc at TodoList.Inbox.add_item/2 (1) (TodoList.InboxTest)
     test/todo_list_inbox_test.exs:3
     Doctest failed
     code: todo_list = TodoList.Inbox.add_item([], "First item")
            [first_item | _] = todo_list
            first_item[:description] === "Second item"
     left: "First item"
     stacktrace:
       lib/todo_list_inbox.ex:18: TodoList.Inbox (module)

.

Finished in 0.08 seconds
2 tests, 1 failure
Our test will fail and we can see that our documentation expects description to contain “Second item” string, but it is actually “First item”.
first_item[:description] === "Second item"
left: "First item"
Ain’t that cool?
Now we can avoid the situation where developers forgot to keep documentation up to date after changing the implementation of the function.
Summary
So now we know how to setup ExDoc to write our documentation. We know how to write documentation for modules and functions, how to describe examples of how to use that function. And also we have discovered how to use “doctests” to test our functions from examples we have provided.