
In Summer 2019, at WWDC, Apple announced SwiftUI. The framework that changes the way we can build interfaces for iOS applications.
In this article, we are going to figure out what is SwiftUI and what it is not.
What is SwiftUI
SwiftUI doesn’t replace everything what was before in iOS development. It provides a descriptive approach to building user interfaces and user interfaces only.
All the Swift code we write to glue application together remains the same such as defining functions, request APIs, parse the JSON, you name it.
On the one hand, it could be treated as a replacement for UIKit. On the other, they can work both together in the same application. That means, if we want, we can transition some parts of an existing application into SwiftUI in small pieces rather than rewriting it from scratch.
Comparing to UIKit, SwiftUI allows us to write less code to build user interfaces.
Yet another advantage of SwiftUI that it allows sharing the code between multiple apple platforms. It supports watchOS, tvOS, and macOS applications.
By the way, if you’re familiar with ReactJS, you may see some similarities with SwiftUI. Most of the parts will look easier. At least for me, even though I have some knowledge about React.
Requirements
Let’s see what tools do we need to build apps using SwiftUI.
Since those are Apple applications, we should have a Mac computer and Xcode.
Make sure you run Xcode 11 and macOS Catalina. You can download Xcode from the App Store for free.
Technically you can build SwiftUI apps on a previous macOS version, but in this case, the live reload won’t work, and you will need to run the application every time to check the changes. We will talk about the live reload in a bit.
Now, when we have all the required tools, let’s try to build our first application.
Hello World
Let’s create a simple application, and try to play with it a little bit without diving too much into details.
Run your Xcode and choose “Create a new Xcode project” from the welcome screen. Or you can use “File > New > Project…”.
Then choose “Simple View App” and click next. In the next window, fill in the Product Name, make sure the language is Swift and User Interface is SwiftUI.

Then pick the folder where to save the project and click “Create”.
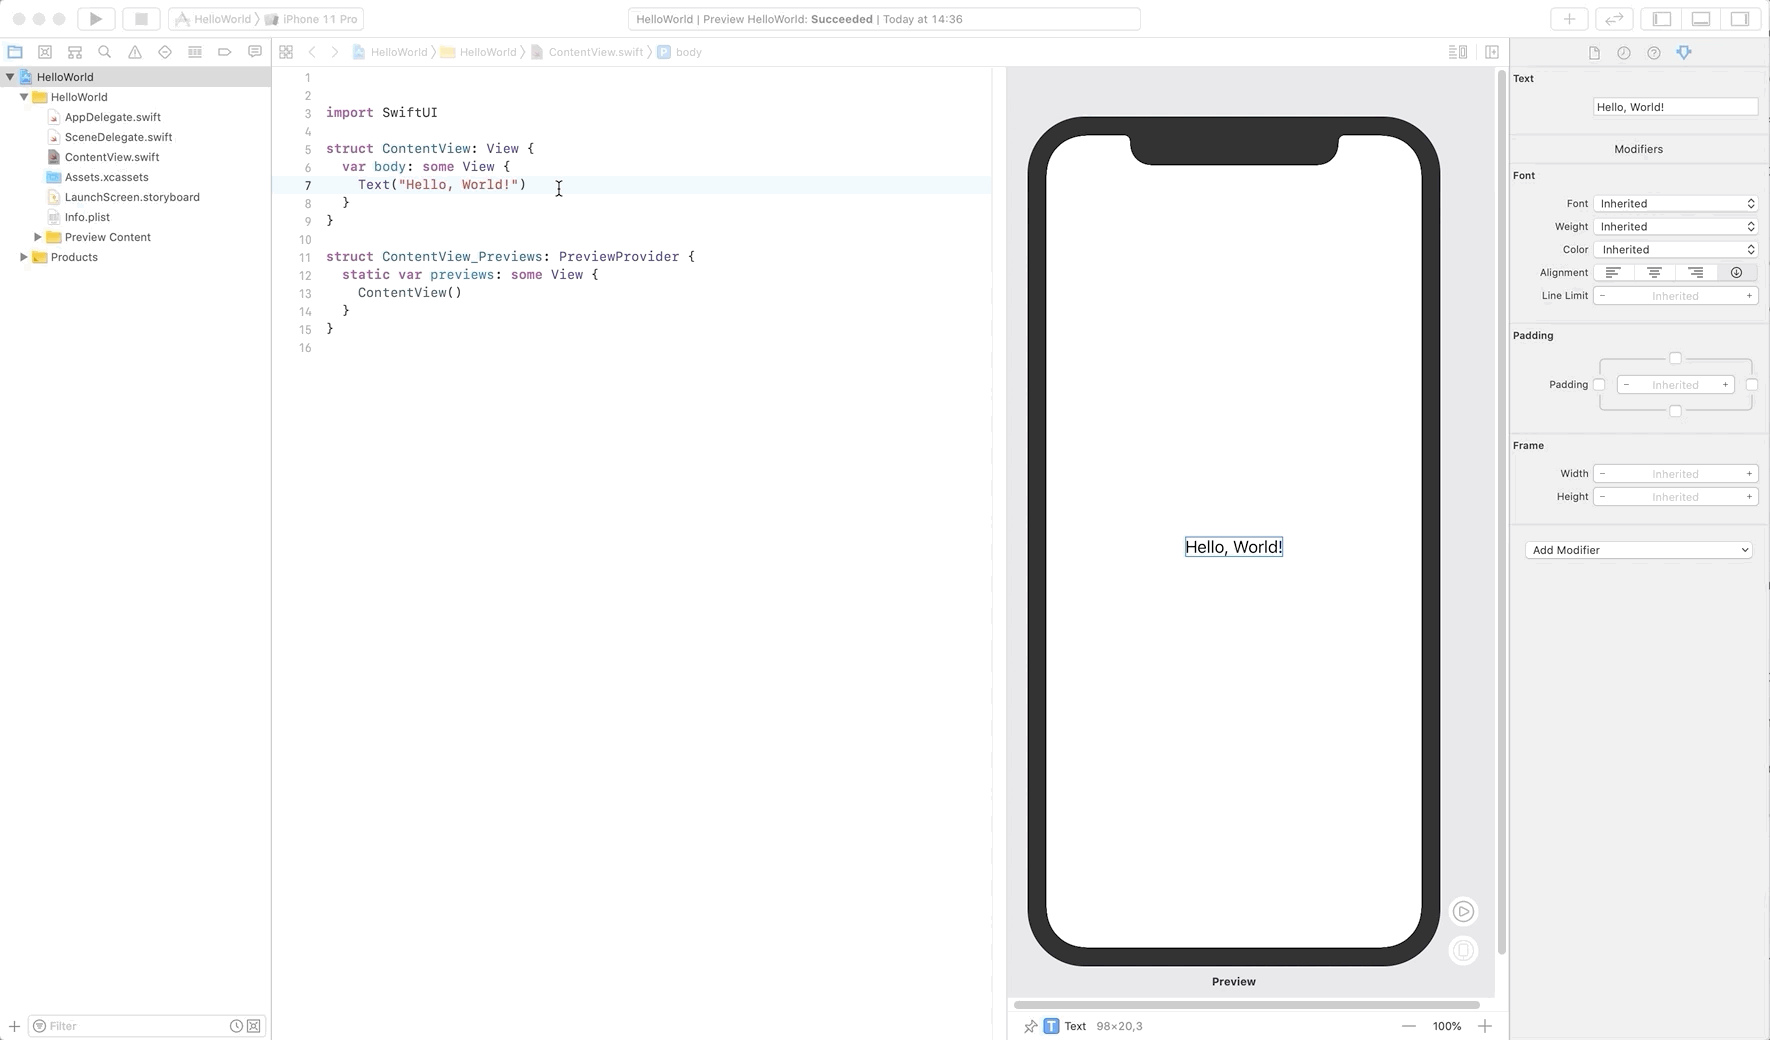
Xcode creates a new SwiftUI project, which should look similar to the one on the screenshot below.

You can see SwiftUI code for the current view on the left and the result on the right. This area is called “canvas”. You may need to click a reload button in the upper right corner of the canvas.
The good part about the canvas is that it can use live reload functionality to provide quick feedback about changes we are making.
Take a look at this example.
In this example, I’ve attached two new properties to a text view: bold() to make its font bold, and foregroundColor(.green) to change the text color to green.
Text("Hello, World!")
  .bold()
  .foregroundColor(.green)
You can see how the result changes while I type these changes.
Now let’s talk a little bit about the other parts of the code we have.
import SwiftUI
We are importing SwiftUI library here in order to use its features. That makes sense.
struct ContentView: View {
  var body: some View {
    Text("Hello, World!")
      .bold()
      .foregroundColor(.green)
  }
}
The ContentView struct contains all the required code to make our view work.
It consists of a text field and some properties to change the look of the text on the screen.
struct ContentView_Previews: PreviewProvider {
  static var previews: some View {
    ContentView()
  }
}
The ContentView_Previews struct is responsible for presenting the view on the canvas.
In our case, it uses ContentView as-is to render it.
In your application, you will have a variety of views that can require some data to work.
We can populate the view with dummy data inside ContentView_Previews just to see it on the canvas.
A little bit more
Let’s take a look at a couple of other things we can easily do.
That’s by no means the complete list of all SwiftUI capabilities. I just want to provide a quick overview of some of the basic concepts.
Add Button
Consider the following example:
struct ContentView: View {
  var body: some View {
    VStack {
      Text("Hello, World!")
        .bold()
        .foregroundColor(.green)
        .padding(50)

      Button("I'm a button", action: {
        print("Button tapped!")
      })
    }
  }
}
There are several things that happened here.
First, is VStack.
We can organize views vertically, horizontally, or by Z-axis.
In our case, we organized the text and the button vertically.
Next, we can add more modifiers to our views. Now the text has a padding modifier: padding(50).
Then we added a button with the text and action.
That’s how the view should look on the canvas on in the simulator.
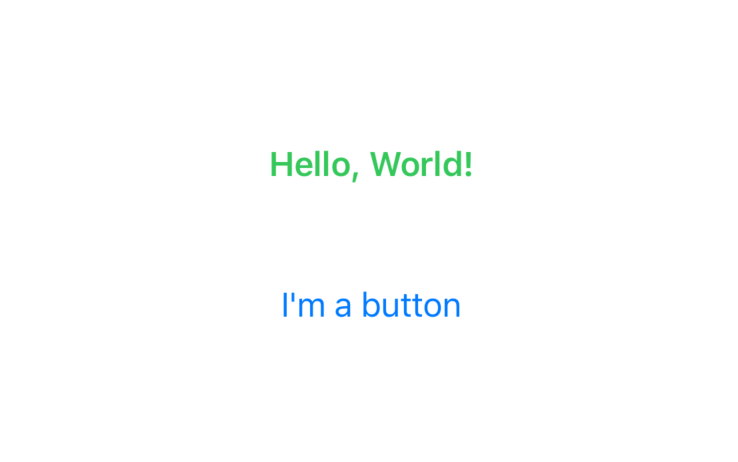
Every time we tap a button, it will print “Button tapped!” text into the debug area.
Changing values by taping a button
Now let’s try to update some information on the screen.
Views, which we are describing, can have a state and that state change on certain events.
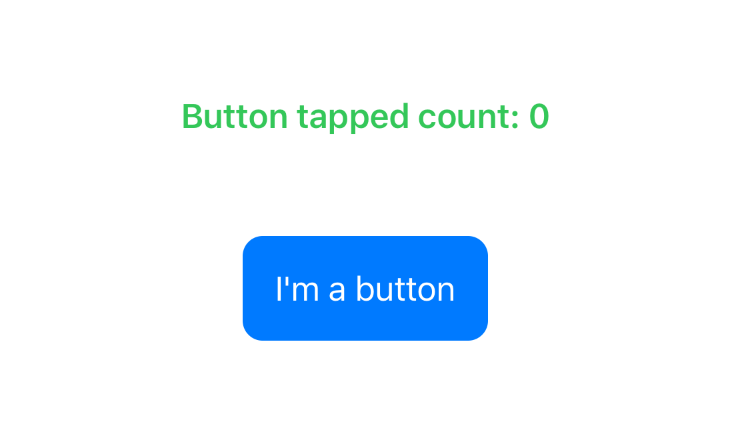
For this example, we are going to add a state to hold a count of times button tapped and display that value on the screen.
First, we need to define a state variable in the view structure.
struct ContentView: View {
  @State private var count = 0

  var body: some View {
    // ...
  }
}
Now, we can change the state value on the button tap.
Button("I'm a button", action: {
  self.count += 1
})
And of course, we can read the state value. Let’s update our text to:
Text("Button tapped count: \(count)")
Now run the app and see that in action.
GIF button_counter
Add some properties to button/text
A button is also a view in SwiftUI. That means we can add modifiers to it as well.
Let’s make it look more like a button:
Button("I'm a button", action: {
  self.count += 1
})
  .padding()
  .background(Color.blue)
  .foregroundColor(.white)
  .clipShape(RoundedRectangle(cornerRadius: 10))
Now it has a background color, text color, and shape.
Wrapping up
That’s a very brief overview of SwiftUI. In the next articles, we are going to take a more in-depth look at different parts of it.
To get a better grasp on SwiftUI, I would suggest watching a WWDC 2019 keynote and check the SwiftUI documentation.