
In the previous article we have covered how to create a “Hello World” app in React Native.
One of the best ways to learn a new programming language or a technology is to start building something with it. I would like to apply that technique in the series of the following articles.
We are going to build an app from zero to production and learn the React Native on the way.
Let’s get started.
The idea
First, let me describe the idea.
My daughter is learning to read. One of the techniques they use at school is the technique of sight words.
According to wikipedia:
Sight words, often also called high frequency sight words, are commonly used words that young children are encouraged to memorize as a whole by sight, so that they can automatically recognize these words in print without having to use any strategies to decode.
In other words, kids learn to recognize and read those words once they see it, without making any effort of splitting them into syllables.
The way how they do it at school, they have a bunch of cards with those words. They set a timer for one minute and check how much of these words they can read during that time. Of course, to read them easily and faster kids need to practice.
Sounds like a great idea for the app, doesn’t it? Also, it does not look that complex for the first application.
So, let’s implement that.
Implementation details
Here is how I see the prototype we are going to implement today.
The app consists of three screens:
- Welcome Screen - Displays a welcome message and a start button
- Practice Screen - There all the practice happening
- Results Screen - Displays the total amount of practiced words during the last practice session. Contains the restart practice button.
Once we launch the app for the first time we see a welcome message and a start button. The start button starts the practice session, where we show sight words one by one. When time runs out, we render the results screen and amount of words a kid managed to read. The kid can start practice again from the results screen.
You can see the complete example below.
At the end of the article you will be able to build that application.
Let’s jump to the implementation.
Implementation
First, we need to create a new React Native application in the same way we did it in the previous article.
→ react-native init BlitzReading
→ cd BlitzReading
→ react-native run-ios
Now we have a “Hello world” application up and running so we can proceed from here.
As the first version of our implementation, I would like to keep all the screens in the App component.
We are going to display different screens based on the current state.
We might argue that that isn’t the best solution to work with several screens,
but it can help us to build the prototype faster.
Once we have a prototype up and running we can start to refactor it to a better shape.
Let’s start by changing the render method of our App component.
export default class App extends Component {
  render() {
    const { currentScreen } = this.state;
    return (
      <View style={styles.container}>
        { currentScreen === 'welcome' && this.renderWelcomeScreen() }
        { currentScreen === 'practice' && this.renderPracticeScreen() }
        { currentScreen === 'results' && this.renderResultsScreen() }
      </View>
    );
  }
}
We keep using the View component which is the most fundamental component to build UIs.
As soon as React’s render method should return a single top-level element, we are using the View as a wrapper for the child elements.
Also, we are applying some styles to it.
Next, we are splitting the body of the component into three parts.
Every part is responsible for rendering a separate screen.
As soon as we can have a single screen at the same time, we are using this.state.currentState variable to keep the name of the active screen.
Now we need to define a constructor for the App component and set the initial state.
export default class App extends Component {
  constructor(props) {
    super(props);

    this.state = { currentScreen: 'welcome' };
  }

  // ...
}
In React the state is used when we want to have some mutable data which can be changed
What is a state?
It describes the component’s state, which can be changed when some events are triggered and should affect the component behavior or look.
In our case, the App component looks differently depending on the value of state.currentScreen.
We set the initial state to have "welcome" as a currentScreen.
Now, let’s move to implementation of render functions.
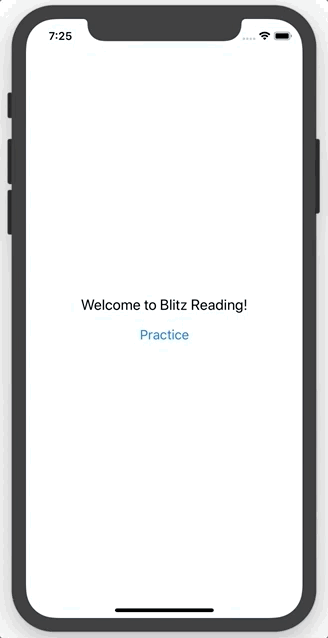
renderWelcomeScreen() {
  return (
    <View>
      <Text style={styles.welcome}>Welcome to Blitz Reading!</Text>
      <Button title="Practice" />
    </View>
  );
}
On the welcome screen, we are using View again as a wrapper for the child components.
Then we use a Text component to render the welcome message.
Next to the text we render a “Practice” button using React Native Button component, to start a practice session.
To be able to use the button inside our component we need to import it at the top of the file.
import {Button, StyleSheet, Text, View} from 'react-native';
The practice screen and the result screen look very similar. They have their own text and buttons.
renderPracticeScreen() {
return (
<View>
<Text style={styles.word}>word</Text>
<Button title="Next Word" />
</View>
);
}
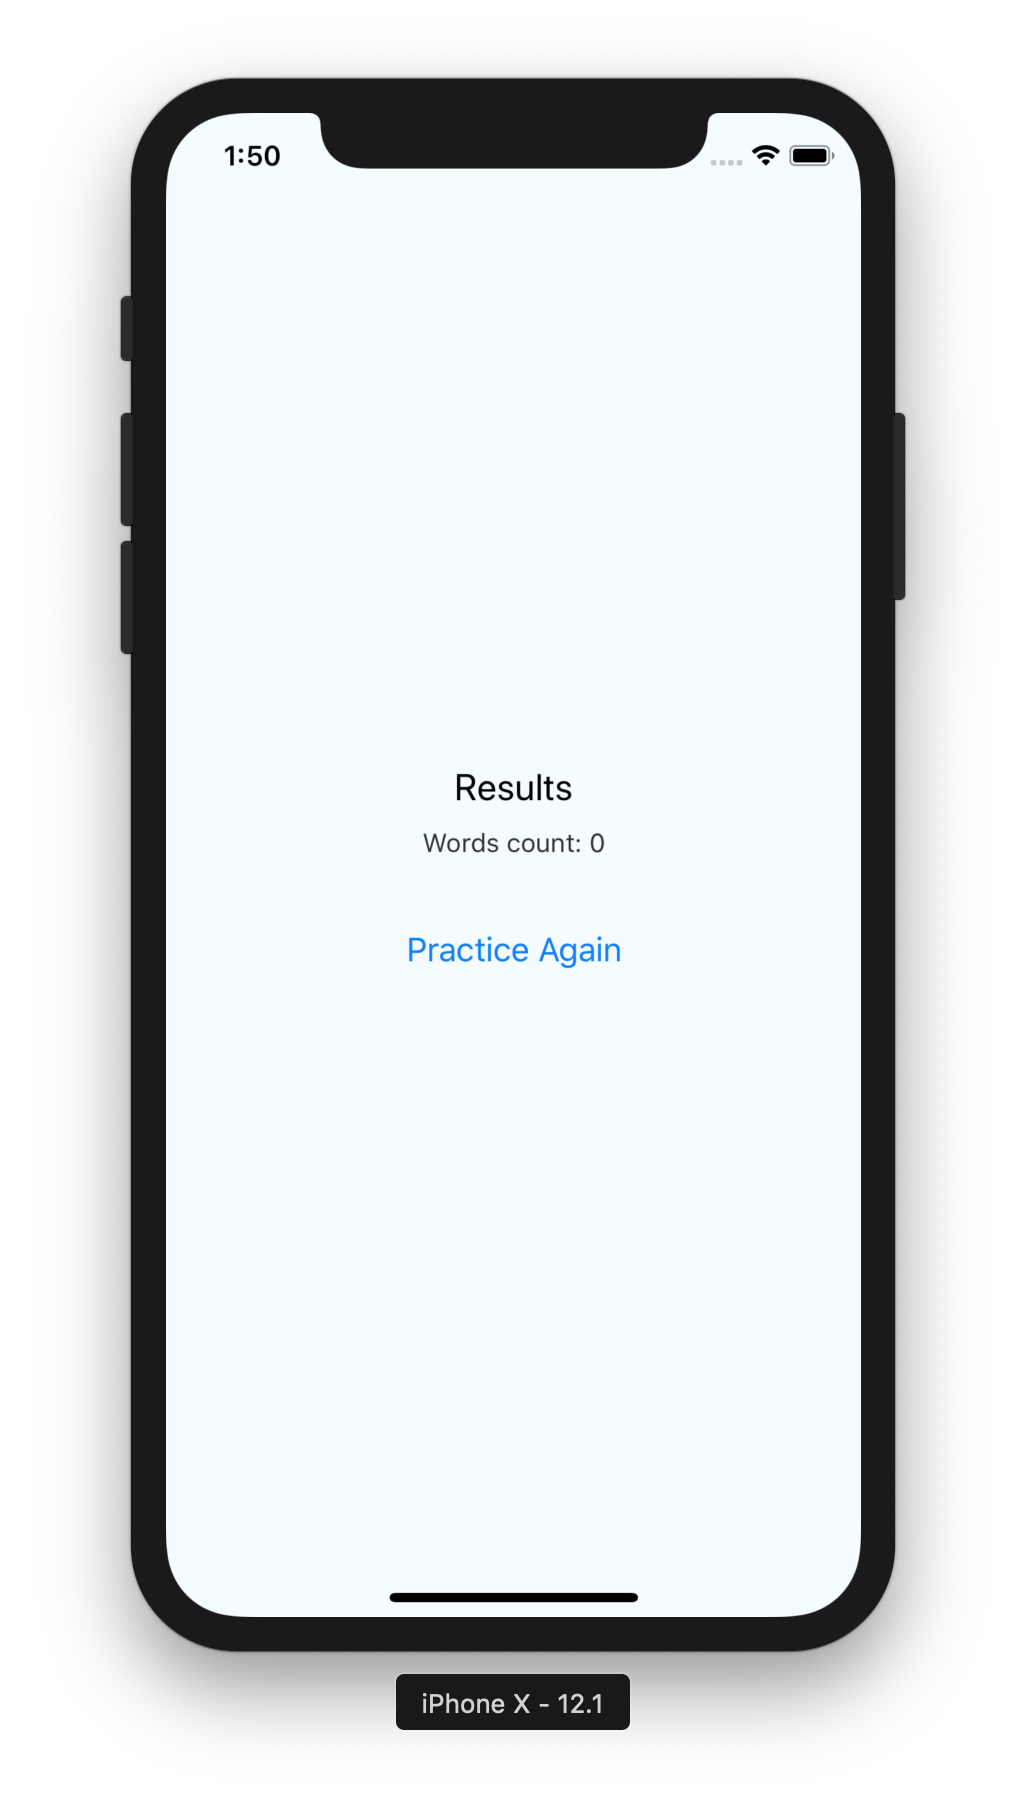
renderResultsScreen() {
return (
<View>
<Text style={styles.welcome}>Results</Text>
<Text style={styles.results}>Words count: 0</Text>
<Button title="Practice Again" />
</View>
);
}
You can notice that every Text component has its own styles.
Which we need to describe using the StyleSheet.create method at the bottom of the file.
That’s how they look.
const styles = StyleSheet.create({
  container: {
    flex: 1,
    justifyContent: 'center',
    alignItems: 'center',
    backgroundColor: '#F5FCFF',
  },
  welcome: {
    fontSize: 20,
    textAlign: 'center',
    margin: 10,
  },
  word: {
    fontSize: 50,
    textAlign: 'center',
    margin: 10,
  },
  results: {
    textAlign: 'center',
    color: '#333333',
    marginBottom: 30,
  },
});
Once we’ve done all of these steps, we can launch the application and check how the screens are rendered.
Currently, we aren’t able to navigate through those screens in the app.
In order to see each of them, we need to change the value of the currentScreen in the controller.


As the next step let’s implement navigation between those screens.
From the welcome screen, we should be able to navigate to the practice screen by pressing a button. From the practice screen (for now) we should be able to navigate to the results screen. The results screen leads to practice, and so on.
To capture a press button event, a Button components should have an onPress property.
Let’s define the on press event for the button in the renderWelcomeScreen method.
<Button
  onPress={this.onPressPractice}
  title="Practice"
/>
By doing so, we are telling the Button to call an onPressPractice function, every time the user press that button.
The onPressPractice function does not exist yet. Let’s define it.
onPressPractice() {
  this.setState({ currentScreen: 'practice' });
}
The function does only one job, it changes the currentScreen value.
If we try to run the app now and press the button, we will face the following error.
this.setState is not a function.

(In 'this.setState({
       currentScreen: 'practice'
     })', 'this.setState' is undefined)

onPressPractice
    App.js:25:18
The setState is a valid function. What’s the problem then?
The thing is, that our function has its own this within that context, and that this is different from the this (for example) in constructor.
To make it work, we need to bind that this to a current context.
Let’s add the following line to the constructor.
this.onPressPractice = this.onPressPractice.bind(this);
Now the app should work.
There are different ways of binding this context in React.
The “React Binding Patterns: 5 Approaches for Handling this” article describes a bunch of those ways.
Once that issue is fixed, let’s navigate to the results screen in a similar way.
First, add the onPress property of the Button inside renderPracticeScreen.
<Button
  onPress={this.onPressNextWord}
  title="Next Word"
/>
Define the method itself
onPressNextWord() {
  this.setState({ currentScreen: 'results' });
}
and bind this in the constructor
this.onPressNextWord = this.onPressNextWord.bind(this);
As the last step, we need to update the Button in the renderResultsScreen method.
<Button
  onPress={this.onPressPractice}
  title="Practice Again"
/>
Now we can navigate through every screen.
Navigate to the results screen by pressing the “Next Word” button, is not exactly what the app should do. What we want instead is to practice for a minute and then got redirected to the results screen automatically.
To do that, we need to start a timer right before we start a practice session to track that time.
Let’s update the onPressPractice method to cover that case.
onPressPractice() {
  setTimeout(() => (
    this.setState({ currentScreen: 'results' })
  ), PRACTICE_TIME);

  this.setState({ currentScreen: 'practice'});
}
then we need to define the PRACTICE_TIME constant right next to our import usages.
But instead of a minute, let’s set it to 10 seconds, that would make it easier to test.
const PRACTICE_TIME = 10 * 1000;
Now, we need to drop the body of the onPressNextWord button.
We don’t need to navigate to the results screen by pressing the button anymore.
We can start the practice, we can click the next button as many times as we want, and we got redirected to the results screen after 10 seconds. It seems to be working now.
The next feature we need to work on is to calculate and display the number of words from the last practice session.
We are going to keep the amount in the state and retrieve it every time we need.
First, let’s add an initial value of totalWords to our constructor:
this.state = { currentScreen: 'welcome', totalWords: 0 };
Then, we increase that value on button press:
onPressNextWord() {
  this.setState({
    totalWords: this.state.totalWords + 1
  })
}
And render that amount on the results screen.
Update the renderResultsScreen method and replace 0 with the correct amount:
<Text style={styles.results}>Words count: {this.state.totalWords}</Text>
We count words and display the amount on the screen. As the last step, we need to reset that value back to zero every time we start a practice.
Update the onPressPractice method to reset it:
onPressPractice() {
  // setTimeout ...

  this.setState({
    currentScreen: 'practice',
    totalWords: 0
  });
}
Once we apply all those changes we can see the correct amount of practiced words.
The next problem is, that we display the same word all the time. That does not look like a proper practice.
Let’s tackle that problem.
First, we need to create a new file and save it as src/words.en.json.
Then, we populate the file with the list of sight words.
["the", "of", "and", "a", "to", "in", "is", "you", "..."]
The complete file you can find on GitHub.
Next, import the file on the top of App.js.
import allWords from './src/words.en.json';
Now, let’s move on to onPressPractice method.
Here we need to grab a word, store it into a state, and display it on the page. As soon as we don’t want the same word to appear more than once during a practice session, we are going to grab an element from the array and remove it.
onPressPractice() {
  // setTimeout ...

  const words = [...allWords];
  const currentWord = words.shift();

  this.setState({
    currentScreen: 'practice',
    currentWord,
    words,
    totalWords: 0
  });
}
First, we are duplicating the allWords array into words.
We are going to modify that array, but we need it to be restored every time we start practice.
We achieve that by copying every element of the initial array to a new array using Spread syntax.
Then we remove the first element from the array using shift function and use it as a current word.
We save all those values into the state.
When we press the “Next” button, we need to grab a new word and repeat similar steps:
onPressNextWord() {
  const { words, totalWords } = this.state;
  const nextWord = words.shift()

  this.setState({
    currentWord: nextWord,
    words,
    totalWords: totalWords + 1
  })
}
Finally, we need to render the current word on the practice screen.
Update renderPracticeScreen and replace
<Text style={styles.word}>word</Text>
with
<Text style={styles.word}>{this.state.currentWord}</Text>
Now we see a new word every time we press the “Next” button and the practice looks more natural.
Let’s move to the next step. At the moment, every our practice looks exactly the same as the previous one. All the words are displayed in the same order over and over again. It would be great if we can randomize them.
One way to achieve that is to get a random element from an array and use it as a current word.
Then we would need to be sure that that word won’t appear again during the same practice session.
Currently, we achieve that by using the shift function.
What we can do instead, is to shuffle the whole array and then pick the first element in the same way we do it now.
How do we shuffle an array? JavaScript does not have a built-in function to do that, but we can implement the simple “Fisher-Yates shuffle” algorithm.
Here is the complete implementation:
export default shuffle = (initialArray) => {
  let array = [...initialArray]; // Prevent changing the initial array

  for (let i = array.length - 1; i > 0; i--) {
    const j = Math.floor(Math.random() * (i + 1));
    let tmp = array[i];
    array[i] = array[j];
    array[j] = tmp;
  }

  return array;
};
Let’s save it into the src/shuffle.js file.
Now we can import it:
import shuffle from './src/shuffle';
and replace the following line from the onPressPractice function
const words = [...allWords];
to
const words = shuffle(allWords);
That’s it. Now, every practice provides random words.
Wrapping up
That’s pretty much it about our first working prototype. Of course, there is a big room for improvement. We probably need to split every screen into its own component. Let’s keep that for the next steps.
We just figured out how to implement a simple prototype. The prototype we can use already together with our kids to learn them read faster.
We’ve just scratched the surface of React Native development.
We didn’t even cover a half of basic components.
The only components we’ve learned are: View, Text, and Button.
But that was enough to implement a working prototype.
In the next articles, we’ll go further and learn some new concepts.
You can find the complete implementation on GitHub page.
See you next time.