
Many mobile applications today are targeting people from different countries. When an application supports several display languages it can reach more people.
Besides the display language, a multi-lingual application can serve different content for different languages.
When users decide to change the language of an application, they need to go through some sort of language selector. That language selector should allow users to see the list of supported languages and choose the one they would like to use.
Today I would like to implement one version of that language selector.
There are billions of ways how to implement language selector. It can be as simple as a set of icons, which a user can click to change a language.
I would like to implement the one which looks similar to the language selector in the Instagram app.
To implement language selector I’m going to use the application we’ve been working on in the previous articles. You can find the list of all those articles here. You can also grab the code from the GitHub repository.
Let’s get started.
Recently we were working on the settings screen of the app. Today, that screen will be the main focus, because we are going to add language selector there.
First, let’s open a src/screens/SettingsScreen.js file and add our future settings list component.
Add
<View style={styles.inputContainer}>
  <SettingsList />
</View>
right before the submit button and import the component at the top of the file.
import SettingsList from '../components/SettingsList';
Then, we need to create a new file src/components/SettingsList.js with the following content:
import React from 'react';
import { Text, View } from 'react-native';

const settings = [
  {
    name: 'Display language'
  },
  {
    name: 'About'
  }
];

class SettingsList extends React.Component {
  render() {
    return (
      <View>
        {
          settings.map((item) => (
            <Text key={item.name}>{item.name}</Text>
          ))
        }
      </View>
    );
  }
};

export default SettingsList;
There is nothing special yet in that component.
We’ve defined a list of items for the settings screen. It contains a language selector and an About screen.
There is an extra “About” menu. It’s there mostly to show how we can add more settings items if we want to.
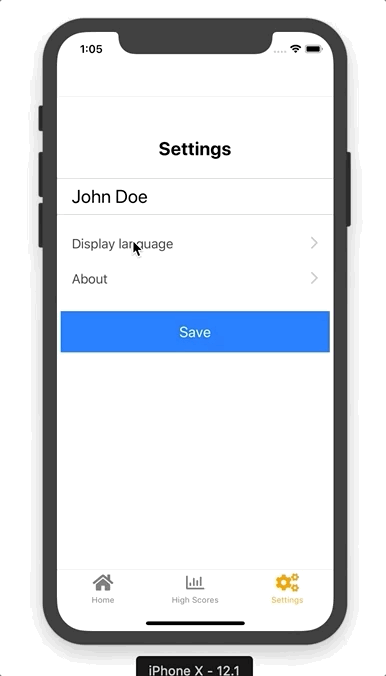
Below you can see the result of those changes. We are going to proceed from there.

We use Text for the list item to check if the initial implementation is working.
Now we need to move forward and implement a better-looking component which will handle all the layout and the future behavior.
Let’s call that component SettingsListItem.
Replace
settings.map((item) => (
  <Text key={item.name}>{item.name}</Text>
))
with
settings.map((item) => (
  <SettingsListItem
    key={item.name}
    title={item.name}
  />
))
Then, import the component at the top of the file
import SettingsListItem from './SettingsListItem';
We started using the component, but it doesn’t exist yet.
Create a new file src/components/SettingsListItem.js with the following content.
import React from 'react';
import { StyleSheet, Text, View } from 'react-native';
import Icon from 'react-native-vector-icons/Ionicons';

class SettingsListItem extends React.Component {
  render() {
    return (
      <View style={styles.listItem}>
        <Text style={styles.listItemText}>{this.props.title}</Text>
        <Icon style={styles.icon} name="ios-arrow-forward" size={25} />
      </View>
    );
  }
}

const styles = StyleSheet.create({
  listItem: {
    flex: 1,
    flexDirection: 'row',
    alignItems: 'flex-end',
    alignItems: 'center',
    padding: 10
  },
  listItemText: {
    marginLeft: 10,
    fontSize: 18,
    color: '#434343',
    width: '90%'
  },
  icon: {
    color: '#CCCCCC',
    paddingLeft: 5
  }
});

export default SettingsListItem;
Let’s walk through the code.
Our component consists of a label and an icon. You can see them wrapped into a View.
To render icons we are using “Vector Icons” library.
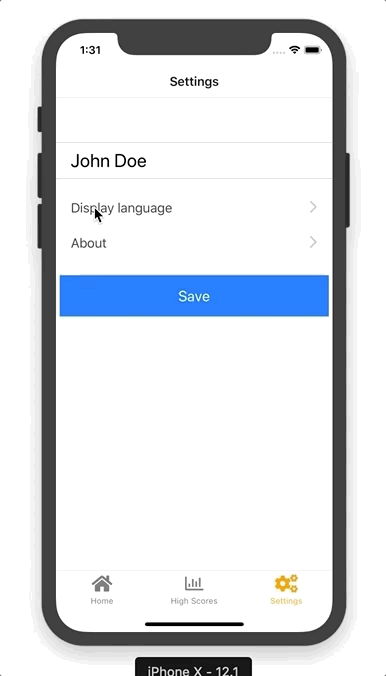
Then, after adding some styles, we can see the result on a screenshot below.

We have a nice looking list. Now, to make it functional, we need to navigate to separate screens every time the user selects a specific item.
Stack Navigator
I’ve already covered the introduction into React Navigation library.
Before we were using SwitchNavigator to move between screens.
Then, we have covered TabNavigator to create a tab menu at the bottom of the screen.
Stack Navigator, which we are going to implement now, provides a way to navigate between screens, by putting every new screen on top of the stack. That allows navigating back to the previous screens.
That behavior suits well for the feature we are trying to implement.
Let’s turn the settings screen into a stack navigator.
In the src/screens/SettingsScreen.js file, right after the SettingsScreen class definition, we are going to define a stack navigator.
To do that, we need to call the createStackNavigator function and pass an object to describe screens.
const SettingsNavigator = createStackNavigator({
  Settings: SettingsScreen,
  LanguageSelector: LanguageSelectorScreen,
  About: AboutScreen
});
A settings navigator consists of three screens. The settings screen itself and two other for each settings item. The keys of the object are routes’ names, and values are screen components.
Now, import the createStackNavigator function at the top of the file
import { createStackNavigator } from 'react-navigation';
In order to make it work, we need to export a SettingsNavigator instead of SettingsScreen component from the current file.
Thus, remove export default from the class definition:
export default class SettingsScreen extends React.Component { /* ... */ }
and export SettingsNavigator instead.
Add the following line at the bottom of the file:
export default SettingsNavigator;
Now we can get back to our screens.
LanguageSelector and About screens do not exist yet. We need to create them.
First, let’s import those screens.
import LanguageSelectorScreen from './LanguageSelectorScreen';
import AboutScreen from './AboutScreen';
Then create src/screens/LanguageSelectorScreen.js and src/screens/AboutScreen.js files with the following content:
import React from 'react';
import { Text, View } from 'react-native';
import styles from '../styles';

class LanguageSelectorScreen extends React.Component {
  render() {
    return (
      <View style={styles.container}>
        <Text>Language selector Screen</Text>
      </View>
    );
  }
}

export default LanguageSelectorScreen;
(For About screen, change the class name to AboutScreen and text to “About Screen”)
Once we have done that, the screens are ready. Next, we need to implement the ability to navigate between them.
To navigate between screens React Navigation provides a this.props.navigation.navigate function which accepts a route name.
In the SettingsScreen pass an onPressItem property into the SettingsList component.
The value of that property will be a callback function.
Once the callback is triggered we are going to navigate to a certain screen.
<SettingsList
  onPressItem={(screen) => this.props.navigation.navigate(screen)}
/>
Now we need to properly pass the screen value from its child components.
Open the src/components/SettingsList.js file.
In that file we are going to update the settings array and provide a “screen” option:
const settings = [
  {
    name: 'Display language',
    screen: 'LanguageSelector'
  },
  {
    name: 'About',
    screen: 'About'
  }
];
Next, pass onPress property into a SettingsListItem component:
<SettingsListItem
  key={item.name}
  title={item.name}
  onPress={() => this.props.onPressItem(item.screen)}
/>
Every time when that callback is triggered, we are going to call a parent’s onPressItem function and pass a screen option of that item.
Next, we need to make the list item touchable.
In the SettingsListItem component, we need to replace <View> with the <TouchableOpacity> and define onPress prop.
import { StyleSheet, Text, TouchableOpacity } from 'react-native';

class SettingsListItem extends React.Component {
  render() {
    return (
      <TouchableOpacity
        style={styles.listItem}
        onPress={this.props.onPress}
      >
        <Text style={styles.listItemText}>{this.props.title}</Text>
        <Icon style={styles.icon} name="ios-arrow-forward" size={25} />
      </TouchableOpacity>
    );
  }
}
After those changes we are able to navigate between screens.
Customize headers
One of the features of the stack navigator is a built-in header which is displayed on every involved screen. The header provides a back button to get to a previous screen as well as header text which can be customized.
Let’s improve our settings screens a little bit, to display a header text.
To configure the navigation options, each screen component can define a static navigationOptions property.
The property can be either an object or a function.
First, let’s define navigationOptions for every screen.
class AboutScreen extends React.Component {
  static navigationOptions = {
    title: 'About'
  };

  /* ... */
}
class LanguageSelectorScreen extends React.Component {
  static navigationOptions = {
    title: 'Language'
  };

  /* ... */
}
class SettingsScreen extends React.Component {
  static navigationOptions = {
    title: 'Settings'
  };

  /* ... */
}
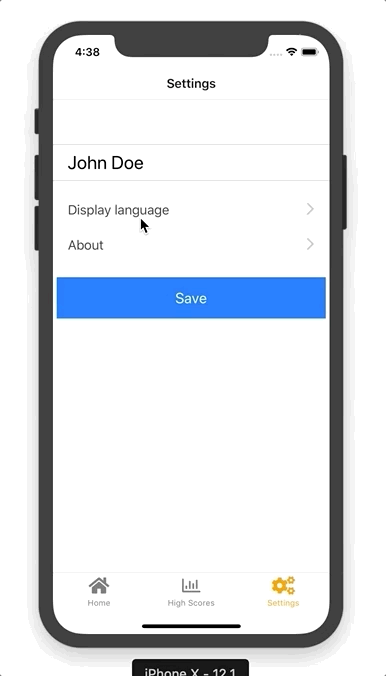
Currently, the settings screen has its own header. We can get rid of it now.
Remove the following lines from the SettingsScreen component:
<View>
  <Text style={styles.header}>Settings</Text>
</View>
Let’s run the app and check how it looks now.
Language selector
Now we can navigate between screens back and forth, that means we are ready for the language selector implementation.
For the language selector, we need to define a similar list as we did before for settings.
Let’s update the LanguageSelectorScreen:
import React from 'react';
import { View } from 'react-native';

import LanguageListItem from '../components/LanguageListItem';

const languages = [
  {
    locale: 'en',
    name: 'English'
  },
  {
    locale: 'de',
    name: 'Deutsch',
    englishName: 'German'
  }
];

class LanguageSelectorScreen extends React.Component {
  static navigationOptions = {
    title: 'Language'
  };

  render() {
    return (
      <View style=>
        {
          languages.map((language) => (
            <LanguageListItem
              key={language.locale}
              isActive={language.locale === 'de'}
              locale={language.locale}
              name={language.name}
              englishName={language.englishName}
            />
          ))
        }
      </View>
    );
  }
}

export default LanguageSelectorScreen;
It defines the list of available languages, then iterates through that list and renders a LanguageListItem component (which we are going to create as the next step).
Create a new file src/components/LanguageListItem.js with the following content.
import React from 'react';
import { StyleSheet, Text, View } from 'react-native';
import Icon from 'react-native-vector-icons/Ionicons';

class LanguageListItem extends React.Component {
  render() {
    return (
      <View style={styles.listItem}>
        <View style={styles.textWrapper}>
          <Text
            style={[styles.title, (this.props.isActive && styles.active)]
          }>
            {this.props.name}
          </Text>
          {
            this.props.englishName &&
              <Text style={styles.subtitle}>{this.props.englishName}</Text>
          }
        </View>
        {
          this.props.isActive &&
            <Icon
              style={styles.active}
              name="ios-checkmark-circle-outline"
              size={30}
            />
        }
      </View>
    );
  }
}

const styles = StyleSheet.create({
  listItem: {
    flexDirection: 'row',
    alignItems: 'flex-end',
    alignItems: 'center',
    padding: 10
  },
  textWrapper: {
    width: '90%',
    marginLeft: 10
  },
  title: {
    fontSize: 18,
    color: '#434343'
  },
  subtitle: {
    color: '#AAAAAA'
  },
  active: {
    color: '#03a87c'
  }
});

export default LanguageListItem;
That list item is quite similar to a list item we implemented for the settings screens with the tiny differences. Here, we can have a subtitle text, which we are going to display under the language. We also render the icon only for active language. The language is active when it’s selected as a display language by the user.
Then, the component has slightly different styles.
Below, you can see the result of those changes.

We have finished with the styling of the list. Now, the user should be able to select its items.
In the LanguageListItem component, change the top View to a TouchableOpacity with onPress property.
render() {
  return (
    <TouchableOpacity
      style={styles.listItem}
      onPress={this.handleLocaleChange}
    >
    /* ... rest of the component here ... */
    </TouchableOpacity>
  );
}
Next, we need to define handleLocaleChange method:
handleLocaleChange() {
  Alert.alert(
    'Change language?',
    null,
    [
      { text: 'Cancel', style: 'cancel' },
      {
        text: 'Change',
        onPress: () => this.props.onChangeLocale(this.props.locale),
        style: 'destructive'
      }
    ]
  )
}
We would like to get a confirmation from the user before we go and change the display language. An “Alert” from React Native suffice for these needs.
It displays a small modal window which contains text and several buttons. In our case, it’s a “Cancel” button, which dismisses the alert window and a “Change” button, which confirms the choice and triggers a callback function.
Now, we need to bind this context in the constructor.
constructor(props) {
  super(props);

  this.handleLocaleChange = this.handleLocaleChange.bind(this);
}
When the user confirms the change, we are going to pass selected locale to a LanguageSelectorScreen.
Update the render() method of LanguageSelectorScreen.
render() {
  const { navigation } = this.props;
  const currentLocale = navigation.getParam('currentLocale');

  return (
    <View style=>
      {
        languages.map((language) => (
          <LanguageListItem
            key={language.locale}
            isActive={language.locale === currentLocale}
            locale={language.locale}
            name={language.name}
            englishName={language.englishName}
            onChangeLocale={(locale) => navigation.navigate('Settings', { locale })}
          />
        ))
      }
    </View>
  );
}
We are passing onChangeLocale property to a LanguageListItem component.
Once the callback is triggered, we are going to navigate the user back to the settings screen and pass a locale as an additional argument.
We also update the isActive property. We set the item to active when its locale is the same as currentLocale.
The currentLocale is blank now, let’s pass in the SettingsScreen.
In the render() method of the SettingsScreen, we need to pass an additional parameter every time we navigate to a new screen.
We are going to pass there a locale from the current state.
<SettingsList
  onPressItem={
    (screen) =>
      this.props.navigation.navigate(
        screen,
        { currentLocale: this.state.locale }
      )
  }
/>
Since we are using a locale from the state, we need to define a default value in the constructor.
this.state = { name: '', locale: 'en' }
Now, we are passing the locale to a language selector screen and back to settings once it’s changed.
As the last piece, we need to grab the updated locale every time we navigate to the settings screen and update the component’s state.
To achieve that, we can define componentDidUpdate callback.
componentDidUpdate(prevProps, prevState) {
  const locale = this.props.navigation.getParam('locale', null);
  if (locale && prevState.locale !== locale) {
    this.setState({ locale });
  }
}
The callback receives two arguments: previous props and previous state.
Inside, we retrieve the locale param passed through screen navigation. Then, if the locale exists and only if it differs from the value from the previous state, we update the state.
It’s important to check here that the value was changed.
If we don’t, then every setState call will trigger another componentDidUpdate so we will end up in the endless loop.
Below, you can see how it works.
Wrapping up
We have covered a lot of stuff today. We have learned how to build nice looking lists. We took a look at Stack Navigator from the React Navigation. We have briefly looked at React Native Alerts.
In the end, we’ve managed to build an Instagram like language selector. Well, it is not 100% identical, but it looks very similar.
The list items we’ve built today, have very basic implementation and don’t cover corner cases.
As one of the other solutions, you can consider using List and ListItem components from “React Native Elements” library.
Those components are more powerful and provide more options.
All the changes we’ve made today, you can find on the GitHub page.
See you next time.